The Super Simple Boho Top Crochet Pattern
- Kelly Phelps
- Sep 2, 2023
- 8 min read
Updated: Apr 28, 2024
The Super Simple Boho Top
By
Craft and A Cuppa
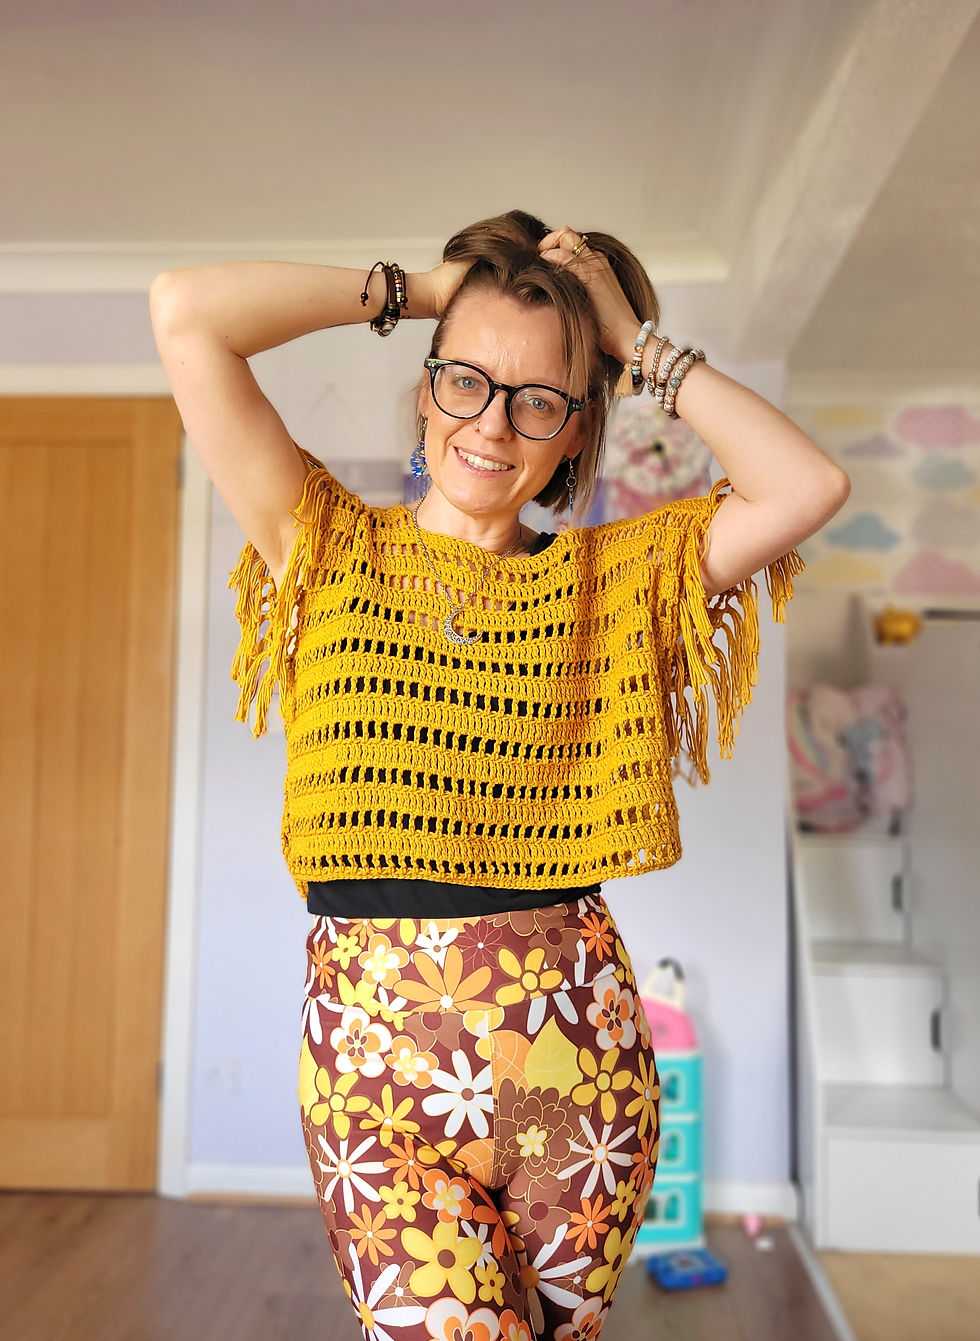
Hey everyone and welcome to The Super Simple Boho Top crochet pattern! This top is made up from 2 panels, one front panel and one back panel. There is also an option to add fringe to the sleeves at the end. It is an oversized top with around 20cm positive ease. This pattern is made to measure so you can use any ply of yarn and hook, although I would suggest an aran/worsted weight cotton with a 6.5mm hook. This is what the yarn yardage is based on. I look forward to seeing everyone’s version of The Super Simple Boho Top.
Written in US terms Advanced Beginner
If you would like to purchase the pdf version, then that is available here...
| XS | S | M | L | XL | 2XL | 3XL | 4XL | 5XL |
Chest (cm) | 71-76 | 81-86 | 91.5-96.5 | 101.5-106.5 | 111.5-117 | 122-127 | 132-137 | 142-147 | 152-158 |
Finished width CIR (cm) | 94 | 104 | 114.5 | 124.5 | 134 | 144 | 155 | 165 | 176 |
Length (cm) | 42 | 43 | 43 | 44.5 | 44.5 | 45.5 | 45.5 | 47 | 47 |
Armhole Depth (cm) | 19.5 | 20.5 | 22 | 23.5 | 24.5 | 26 | 27 | 28.5 | 29.5 |
*Est. Yarn Yardage | 263m-288yd | 298m-324yd | 325m-355yd | 362m-396yd | 389m-425yd | 425m-465yd | 456m-499yd | 500m-547yd | 582m-632yd |
* Est yarn yardage is based on aran/worsted weight yarn
There is also a full length video tutorial for this pattern on my YouTube channel.
YouTube Link - The Super Simple Boho Top Link
Tools
Crochet Hook to match your yarn (I used 6.5mm)
Any yarn (I used Scheepjes Cahlista)
Stitch markers
Tapestry needle for weaving in ends
Tape measure
Sharp scissors
Stitches
ch(s) – Chain(s)
hdc – Half double crochet
rpt(s)- Repeat(s)
RS – Right Side
sc(s) – Single Crochet(s)
sc2tog – single crochet two together
sk – Skip
slst – Slip Stitch
st(s) – Stitch(es)
tc(s) – Treble Crochet(s)
WS – Wrong Side
tc bar – I will refer to a tc bar which is basically referring to a treble crochet, but you will be working around the bar, not in the stitch as it will be on its side.
*……* - Repeat instructions inside the symbols
[……] – Repeat instructions inside the symbols
Notes
Ch2 and ch4 counts as a stitch.
Ch1 does not count as a st.
You can decide which side is the wrong side of your top and which side is the right side! I chose to have my right side with my row of trebles facing me.
Right let’s crack on!......
Pattern
Back Panel
Where necessary sizes will be written as XS (S, M, L, XL, 2XL, 3XL, 4XL, 5XL).
You will make a chain that is as long as the length provided below. It will need to be an even number. Write your number of chs down as you will need it for the front panel and to keep count of your sts throughout both panels.
Row 1 is a row of hdc, if you prefer you can do a foundation hdc row instead and then skip to row 2. If you do a foundation row, it will need to end on an odd number.
Ch until you reach a measurement of 47cm (52, 57, 62, 67, 72, 77, 82, 88)

Row 1
Ch an extra 2 sts (this will class as your first hdc), sk over the 2 chs that you just created and place a hdc in the 3rd ch from the hook, hdc in every ch. You should end up with an odd number of sts, be sure to count the 1st two chs as a hdc.
Row 2
Ch 5, turn, sk next st, *tc in next st, ch1, sk next st* rpt all the way across the row until you reach the final st which will be the ch2 from the previous row, be sure to place your final tc in the top of the ch2.
Row 3
Ch4, turn, tc in chsp, *tc in next st, tc in next chsp* rpt all the way across the row, place your final tc in the very last st which will be the 4th ch of the ch5 from the previous row.
Keep repeating rows 2 and 3 until you are close to the measurement listed below. I say close because these are tall stitches so you may not get the exact measurement. You also need the 2nd from last row to be the straight tc row with no chs in-between. The final row will be a row of hdc.

If you are making this for yourself, you can make it as long as you wish, or you can use the measurements that I provided below
42cm (43, 43, 44.5, 44.5, 45.5, 45.5, 47, 47)
Once you have reached this measurement, or are happy with your length, and the last row that you completed was the straight tc row with no chs in-between, then move on to the final row of the back panel.
Final Row
Ch2, turn, hdc in next st, h
dc in every st along the row, be sure to place your final st in the top of the ch4 from the previous row.
Fasten off.
Front Panel
You will now make the front panel exactly the same as the back panel, but it will be slightly shorter to make room for the neckline shaping. The final row of the front panel before adding the neck shaping needs to be a straight row of tcs with no chs in-between.
Take your back panel and measure down 8cm from the top. Find the row closest to that measurement that is the row of just tcs. This will become the final row of the front panel before neckline shaping. Make a note of the row number as that is how many rows you will make for the first part of the front panel.
Use the back panel instructions to make the first part of your front panel.
Tip – When creating your ch right at the beginning, be sure to line it up with your original ch from the back panel to make sure they are both the same width. It’s so easy to change tension for this part so you need make sure that they are both the same width.
Once you have reached the final row of the front panel you will now move on to the neckline shaping.
Neckline Shaping
Lay your front panel out flat, and using the measurements below, measure from the left side of the top row into the centre and place a st marker in this st. Now you will need to count the stitches from the left corner to the st marker. There needs to be an odd number of sts, so if it falls on an even number, remove the st marker and place in the next st furthest away from the centre.
Rpt for the opposite side making sure both sides have the same amount of sts – odd number.
15.5cm (18, 20, 22.5, 24.5, 27, 29, 31, 33.5)
Row 1
Continuing from the previous row, ch5, turn, sk next st, *tc in next st, ch1, sk next st* rpt until you reach the st marker, place the final tc in the same st as the st marker.
Row 2
Ch4, turn, tc in chsp, *tc in next st, tc in next chsp* rpt all the way across the row, place your final tc in the very last st which will be the 4th ch of the ch5 from the previous row.
Row 3 (if needed)
Ch 5, turn, sk next st, *tc in next st, ch1, sk next st* rpt all the way across the row until you reach the final st which will be the 4th ch from the ch5 on the previous row, be sure to place your final tc in the 4th ch.
Keep repeating rows 2 and 3 until you have the same number of rows as the back panel. (Minus the final hdc row).
Final row
Ch2, turn, hdc in next st, hdc in every st along the row, be sure to place your final st in the top of the ch4 from the previous row.
Now you will repeat these instructions for the other side but you will start in the same st as the st marker for the opposite side of your neck shaping.

Assembling
Now you will need to get the back and front panel ready for assembling. Lay the back panel flat down with RS facing up. Next lay down the front panel on top of the back panel with the WS facing up making sure your neckline is at the top. The right sides should be touching each other.
Take your tape measure and measure down each side from the top…
19.5cm (20.5, 22, 23.5, 24.5, 26, 27, 28.5, 29.5)
Place a st marker at the measurement, rpt for the other side. This will become the armholes.

Next you will seam the shoulders together with your preferred seaming method. I chose to use my hook and slip stitch through both sts on the front and back panel. Make sure you go through the top of the turning chs at either the beginning or end of the previous row.
Fasten off.
Now you will seam the sides using your preferred seaming method. I chose to use the invisible side stitch seam as I have changed colours throughout my garment.
Lay your pieces side by side and using a needle go through the top loops of the seam bars, starting on the left side first, then going over to the right, then back to the left and so on until you reach the st marker.
Fasten off and rpt for the opposite side.
Now you will need to turn your top the right way out!
Neckline
You will now add a round of single crochet around the neckline. Lay your top down with the front facing you (RS out) and attach your yarn at the shoulder seam on the left of the garment.

Row 1
Attach yarn with a slst, ch1, sc2tog (seam and 1st st along the back neckline) sc in every st along the back until you reach the final st before the next shoulder seam, sc2tog (last st and shoulder seam), *place 3 sc around the next tc bar* rpt until you reach the last tc bar, place 2 sc around the last tc bar, sc2tog (around tc bar and the 1st st on the front of the neckline), sc in every st along the front until you reach the final st, sc2tog (final front st and around the tc bar) place 2 more scs around the tc bar, *place 3 sc around the next tc bar* rpt until you reach the final tc bar, slst to top of 1st sc2tog to join.
If you would like to add more to your neckline then you can do as many rows of sc as you wish. I only done one round.
Fasten off and weave in ends.
Fringe – Optional
If desired, you can add fringe around your sleeves.
I would suggest using 5-7 strands of yarn for your fringe, cut at roughly 25cm.
Cut yarn strands around 25cm long.

Place them all together and fold them in half to create a loop in the middle.

Place your hook through the space where you would like to add fringe. I would suggest going through the top seam first, then skipping a tc bar and going around the next one. This way if you feel you want to add more fringe, you can fill in the gaps, rather than doing it all at once and feeling like you have added too much! It’s easier to add than take away.
Take your yarn and put the middle loop that you created over the top of your hook.

Carefully pull the loops through the bottom of the tc bar making sure each piece of yarn goes through.
Take your hook out and gently widen the loop with your thumb and forefinger. Then pull the tassel ends through the loop.

Pull each strand tight to neaten up your fringe. Trim ends with sharp scissors. Rpt all around and for the opposite sleeve.
Well done! Its finished! You can now shimmy your shoulders about to get that fringe wriggling! A handy tip is to use hair straighteners on a low setting to make your fringe poker straight!


I would love to see your makes! Please tag me on Instagram, TikTok, Facebook, Threads and YouTube @craftandacuppa using the hashtag #thesupersimplebohotop.
This pattern is not to be copied or resold. Please do not use my pictures. You may sell items that you have made from my patterns as long as you credit me as the designer Craft and a Cuppa.
Comments